


“Design is intelligence made visible.” — Alina Wheeler
 on [Unsplash](https://unsplash.com?utm_source=medium&utm_medium=referral)](https://cdn-images-1.medium.com/max/10368/0*ol3kdP4iZC2UCSXg) Photo by
Photo by Creativity
As a student from Digital Media UVU I would like to let you know that the greatest experience that I had at this school was about how to utilize my brain and my ideas together. A few years ago, I wasn’t unable to create anything or to build anything. My mistake was believing that I was not good enough. However, you will find out that the best artist in the world is not famous because she/he was born with all a bunch of skills or because that person was born to be famous. The main reason is that creative people learn how to use their tools, and learn how to be consistent.
If you are a student, and you believe that you don’t have the skills, I will recommend you to keep your head-up and start looking around you since you have a lot of resources that will help you to get the skills that you know. At this point, you will think that a lot of people said that already, but the problem is that you should start using the tools that you have around you to be able to gain some experience and some knowledge.
As a designer, you will need to think outside of the box and start thinking that you will need to help yourself little by little, and you will see that you will get there.
How to start with a project
To start a project, you will need to consider the following things:
Type of project that you will create
What is the main topic?
Who is your audience?
What is the message?
What tools are you going to use?
Do we have any requirements that we need to accomplish?
Do we have to work with someone else?
What colors, we will need to use?
As I explained before, my head will always work in the way that I will need to think about the problem as much as the design to see if I’m able to see the project from different angles. In this way, I will start brainstorming on things that I like and dislike about the project to be able to create a projection of where I want to go.
 on [Unsplash](https://unsplash.com?utm_source=medium&utm_medium=referral)](https://cdn-images-1.medium.com/max/12000/0*QvBfCw_vFL5t3LNc)
The Project
On this occasion, I will share my project and the ideas that I had for one of my current projects. This project was about the current program at UVU called Surveying & Mapping. The reason why I decided to do this collaboration with this department was that I was enrolled for a class DGM-2240 and we supposed to work with one of the departments at school to start helping them to create a better vision, to create better attention to this program.
Then, the program that I decided to help at UVU was the Surveying & Mapping. For all of the people that don’t know anything about this program, I would like to share a little bit more about what is this program about, and a little bit of the history of this major.
Surveying & Mapping: Surveying or land surveying is the technique, profession, and science of determining the terrestrial or three-dimensional position of points and the distances and angles between them.
Problems with the program: The level of enrollment at this program is too low, and not many people know that exists this program at UVU. The school is having problems to create more attention to this major.
Social Media: They don’t know how to publish content on social media, they don’t know how to make the right decisions to attract more people.
Solution: To start with a solution, I needed to do a study to know how many students know about this program, how many students can be interested in this major, and how many students are undecided about their major to see possible strategies that can help me to create a better idea of how I will need to create my design to make sure it will catch the attention of a hundreds of students.
 on [Unsplash](https://unsplash.com?utm_source=medium&utm_medium=referral)](https://cdn-images-1.medium.com/max/8000/0*kLs7Qj_qjZUIVczU)
For this reason:
I decided to start building a survey where I ask the following questions:
1. How interested/happy are you with your (or your child’s) current major?”
2. How interested are you (or your child) in technology involving drones and 3D mapping?
3. When going to the Surveying and Mapping site, what are the main things you’re looking for?
4. Do you belong to, or would you join (or recommend that your child join) clubs or meetups related to their major?
5. Did going to the site make you more interested in choosing Surveying and Mapping as a major? If so, how likely are you to switch your major to Surveying and Mapping?
6. What factors would make you consider enrolling in the Surveying and Mapping program at UVU?
7. How helpful would it be to have contact information on the site to ask questions about the major?
8. How do you feel about the current UVU Surveying and Mapping site?
9. What are some things you like or don’t like about the site?
10. Would you be willing to participate in an in-person interview or focus group?
 on [Unsplash](https://unsplash.com?utm_source=medium&utm_medium=referral)](https://cdn-images-1.medium.com/max/10368/0*6ErJk3fvl5o-OPfr)
With this type of question, I was able to get into some conclusions. The amazing thing here is that I sent this survey to 700 hundred people to have a more accurate answer, and to have better results.
Explanation of how I did this step:
Visit the SurveyMonkey website at http://www.surveymonkey.com/.
Click “Sign In” at the top of the page.
Enter your Username and Password associated with your Survey Monkey account and click Sign In. Click here to create a Survey Monkey account: https://www.surveymonkey.com/MyAccount_Join.aspx?utm_source=account_login.
Alternatively, you can sign up using the Sign Up with Facebook or Sign Up with Google buttons on the right.
Click the “+Create Survey” button at the top of the page.
Enter a title for your survey and select a category. You can also choose to Copy an existing survey or Use an expert survey template.
Select a template to use for your survey and click Next.
You will have the option to make edits to the default survey and template on the left side of your survey.
Click the “Collect Responses” tab at the top.
Click the method you wish to use to distribute your survey. (The first option has been used in the example.)
Click “Next Step”.
Design the survey. Opening the account and knowing the basics of creating the survey are only half the process. The real work comes in designing an effective survey that elicits the information you’re after. This means that you need to know, without a doubt, what it is that you’re seeking. Creating a survey without having a clue as to what you want from it will simply waste the time of all involved. Moreover, if it’s clear to survey takers that the survey is random, they’re much more likely to avoid taking it, especially if it appears like spam. When designing your surveys content, bear the following in mind:
When creating a survey, keep the questions relevant above all. Do not try to seek tangential information or those answering it will be surprised and possibly less candid.
Anonymity is a useful way to get people to respond to surveys openly — provide this option unless it’s essential to get names. If taking names, always advise as to how you’ll maintain the confidentiality of details (such as aggregating the results without mentioning individuals). If you don’t think people will self-identify but you’d like them to do so, offer an incentive such as a free e-book or similar for those who provide email addresses for future correspondence, etc.
Effective survey questions tend to be: brief, simple, relevant and jargon-free. Avoid using questions that are loaded (assumption-filled) or leading (directs the answer).
Put sensitive or demographic questions at the end of the survey — a survey taker is more likely to opt-out early if these appear at the front. In the same vein, ask interesting questions at the front.
Avoid cluttering up the survey. Use white space and only ask one question per line.
Test the survey before you send it to live. This will allow you to find quirks and things that don’t make sense. Test it on a few friends or family members to gauge their responses.
Interview with the person in charge of this department:
To start pulling or detailing for this information, I needed to have an interview with the person that was in charge of this department. In this way, I will conclude with the main ideas and the subjective data that I got through the survey.
At this point, I decided to make this little questionary:
What was the first inspiration for this project? Follow up: What are some goals you want to complete with this inspiration?
What is your biggest obstacle in hitting your goals? Follow up: What will hitting these goals do for you?
From all the projects or prototypes from the other departments, Do you have something in mind that you would like to build for your site? Follow up: Pick 3 of your favorites.
Is there a desire to grab the interest of people other than those interested in land surveying, photogrammetry, remote sensing, etc? Follow up: What sorts of things would you like those people on the outside to know?
How will you define your audience? Follow up: who are your users?
What is the feeling that you would like to present to the end-user? Follow up: How will this promote the end goal of what you are trying to achieve?
What technology and resources are available to UVU to run this program? Follow up: How UVU will take advantage of this project?
Briefly describe your program, who do you serve and what’s your product/offer? Follow up: How willing and able are you to invest in your business right now?
How would you define the success of the project? Follow up: Going off of your defined measurement, at what point will the project be successful with our help?
What is your time-table for success? Follow up: Who is responsible for managing the timeline?
 on [Unsplash](https://unsplash.com?utm_source=medium&utm_medium=referral)](https://cdn-images-1.medium.com/max/8000/0*6GN89bpLMCGTxUoJ)
By doing this, I discover that some people needed to be involved in the process and that I will need to follow some institutional standards to make sure I will not create something that the schools don’t want. With all of these questionaries, I was able to create a picture on my mind of how the project will be build and how the project will be present to my audience.
Design Process
I started to take a look at some issues in the current design on this website. Then, I started to write about these issues to make sure I will not make the same mistake. To see my see website, you will need to click **here** and to see the notes that I created, you will need to read the article that I wrote a few weeks ago (https://medium.com/@ithvaandres/things-that-we-need-to-change-on-a-school-website-f27c4135fe43).
Then, I started to create some wireframes:
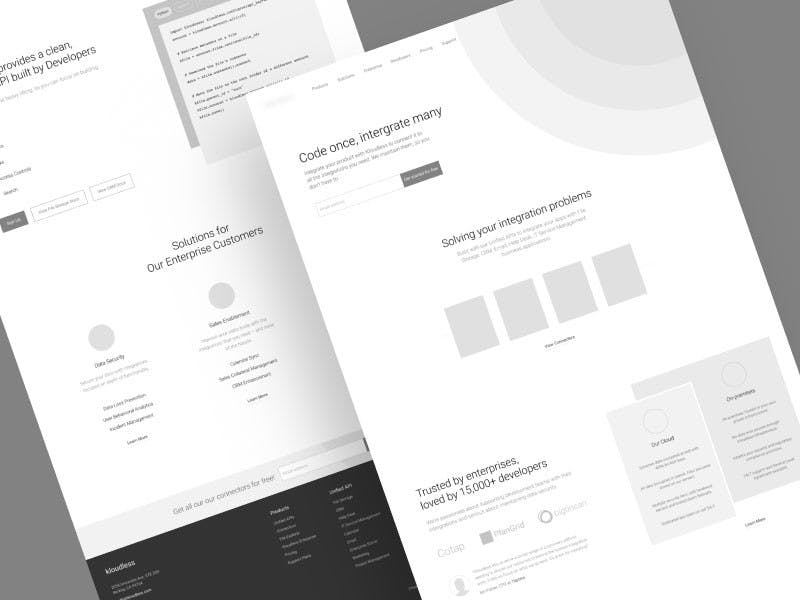
The tool that I used to create this wireframe was Adobe XD: AdobeXD is where XD stays for Experience Design, used for beautiful and professional Prototypes of Websites & Apps. It is Basically a UI/UX Designing application like Sketch, in my opinion, It has a bunch of tools like pen tool, selection tool, etc. Designing in XD is simple.
Is Adobe XD CC Free? Adobe XD CC is Now Available for Free. In a step clearly intended to maintain dominance in an increasingly competitive market, Adobe has announced that XD CC (eXperience Design) is being released to the community as a free application. If you would like to get this tool, you will need to click on the following link: https://www.adobe.com/products/xd.html.
My wireframes:
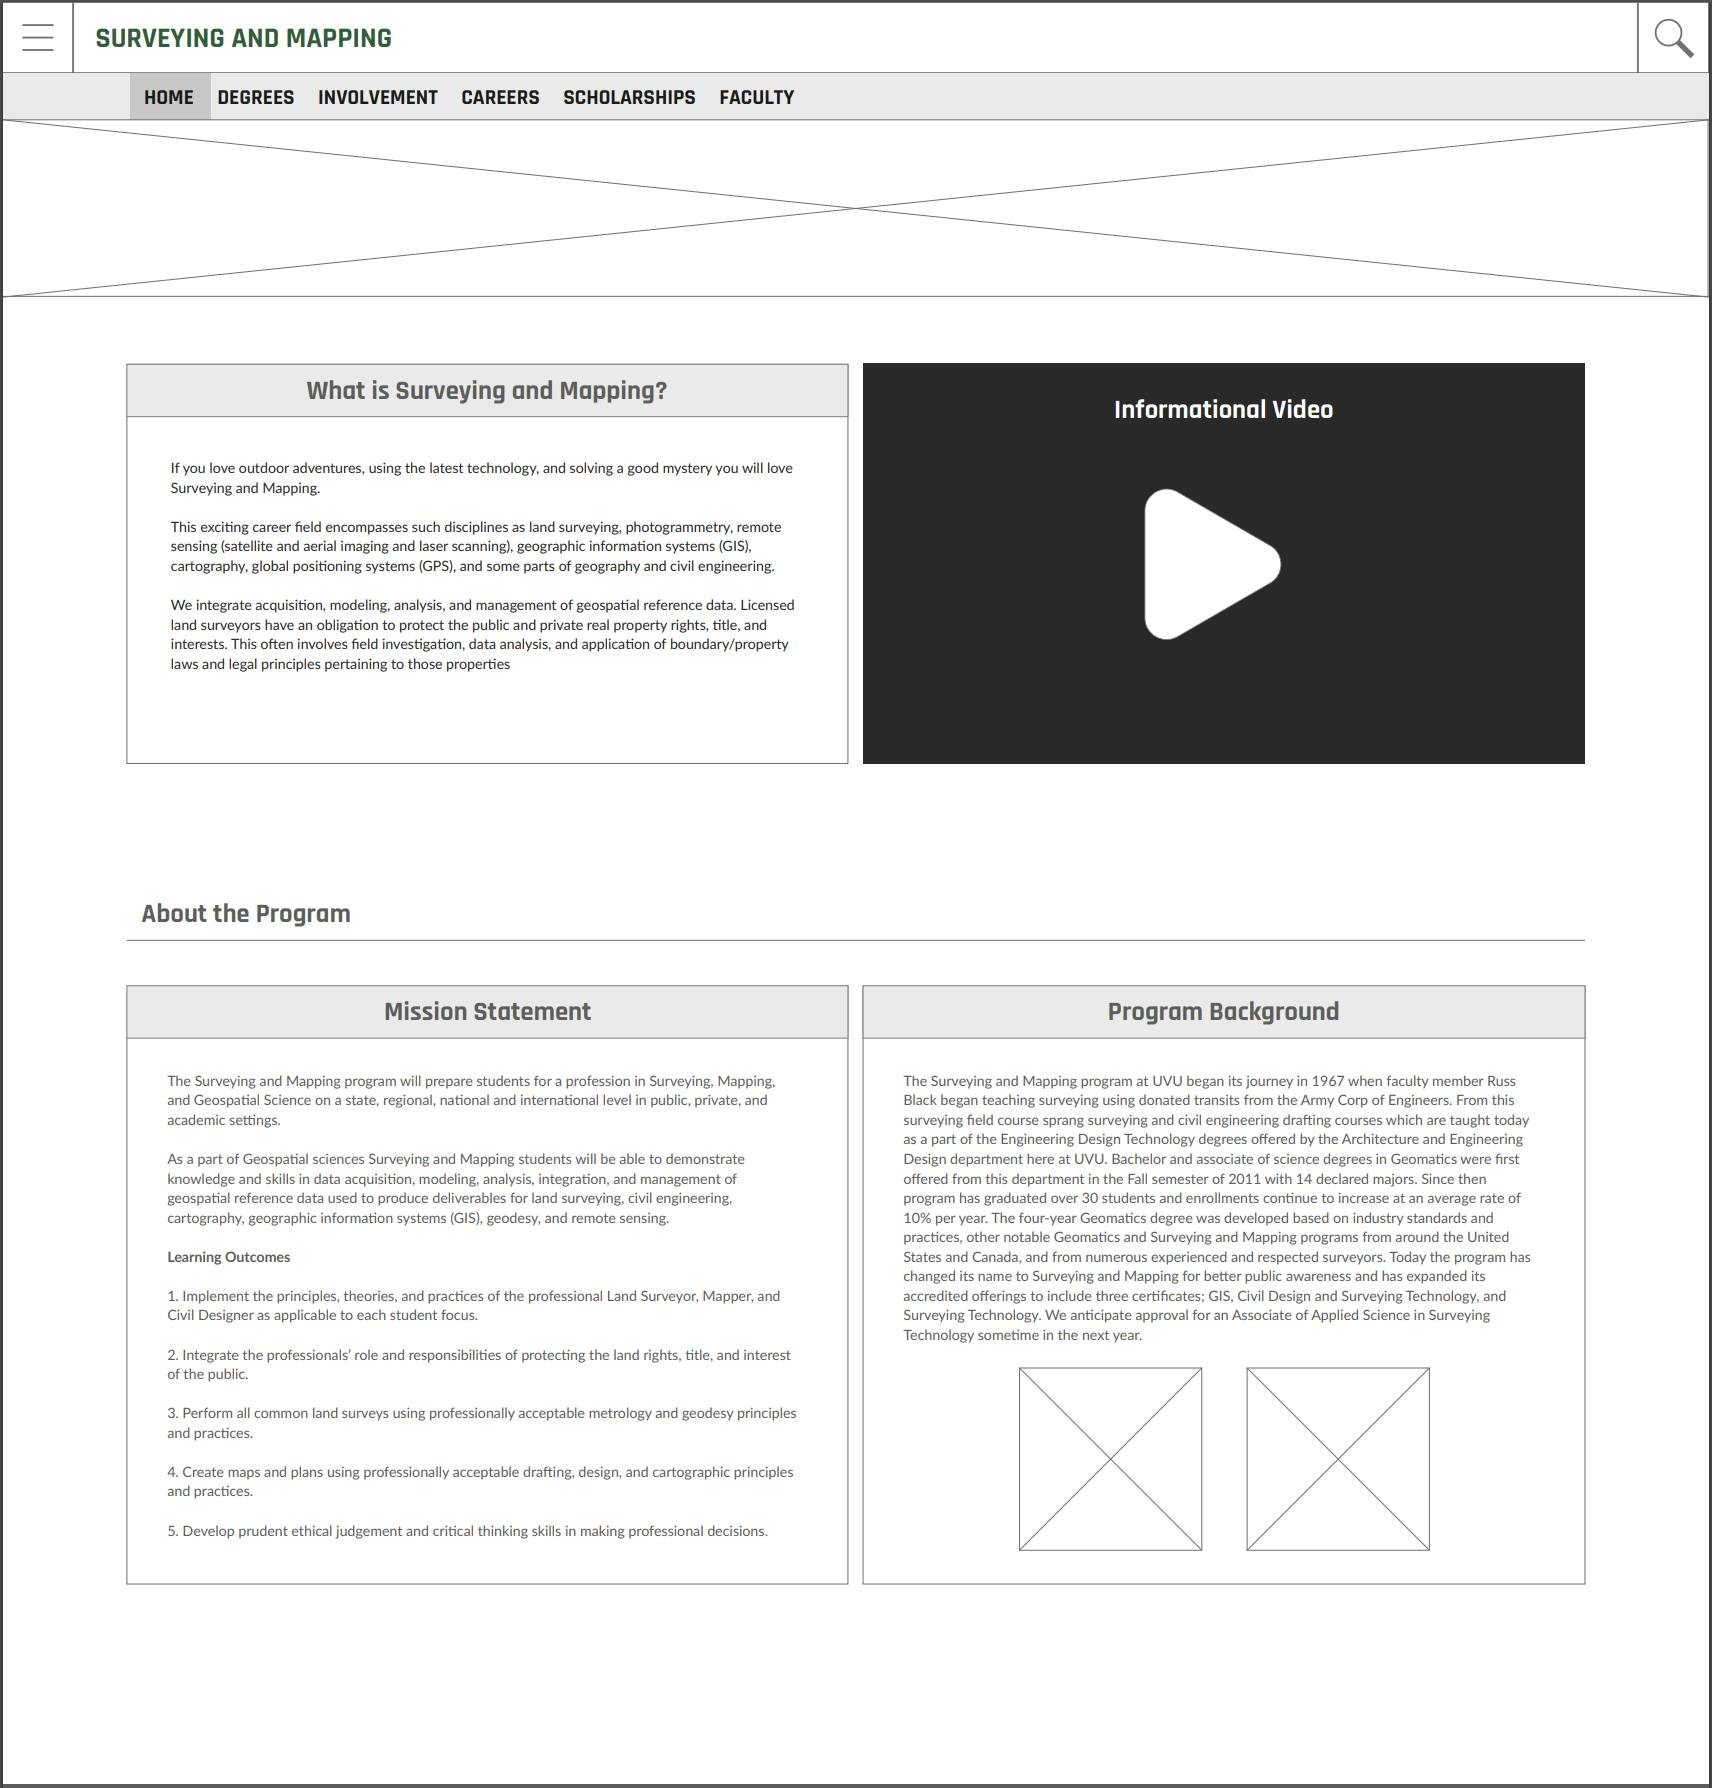 Main Page / Home Page
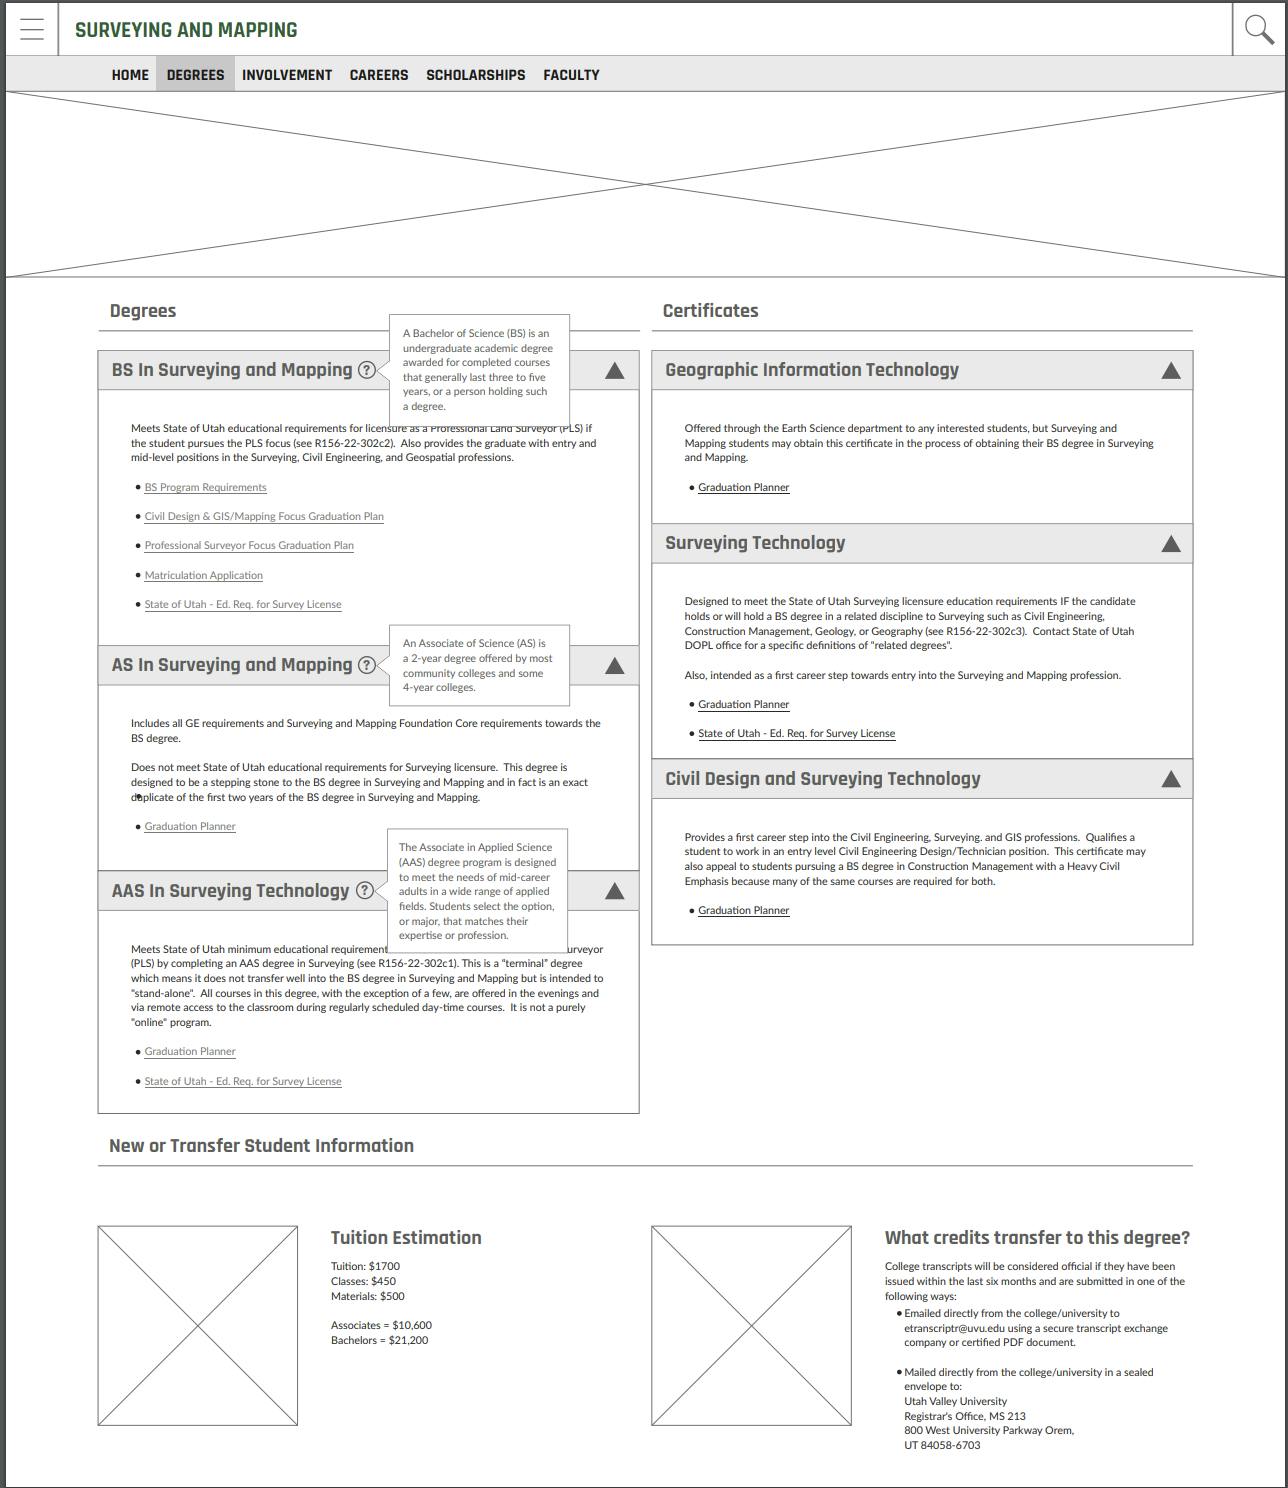 Degrees Page
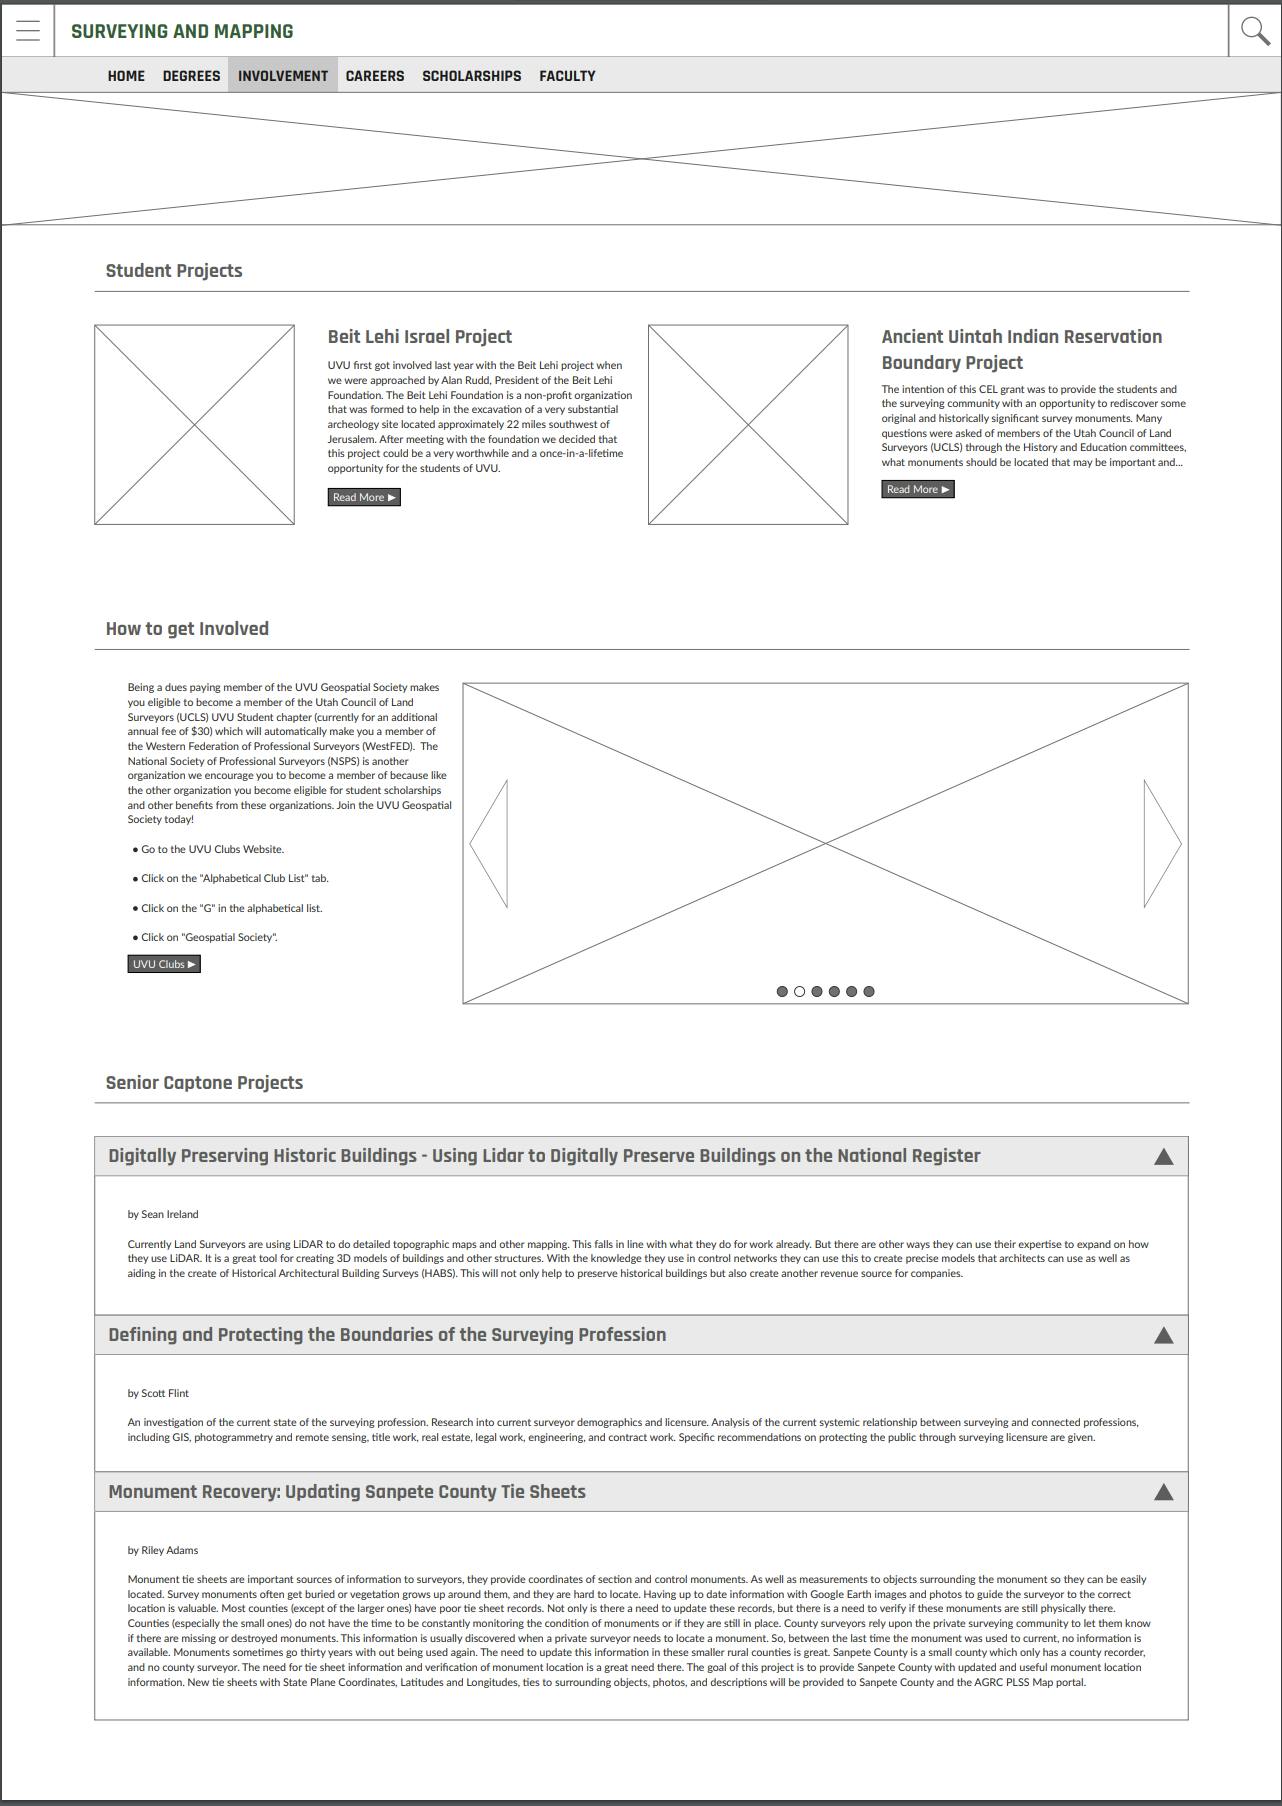 Involvement Page
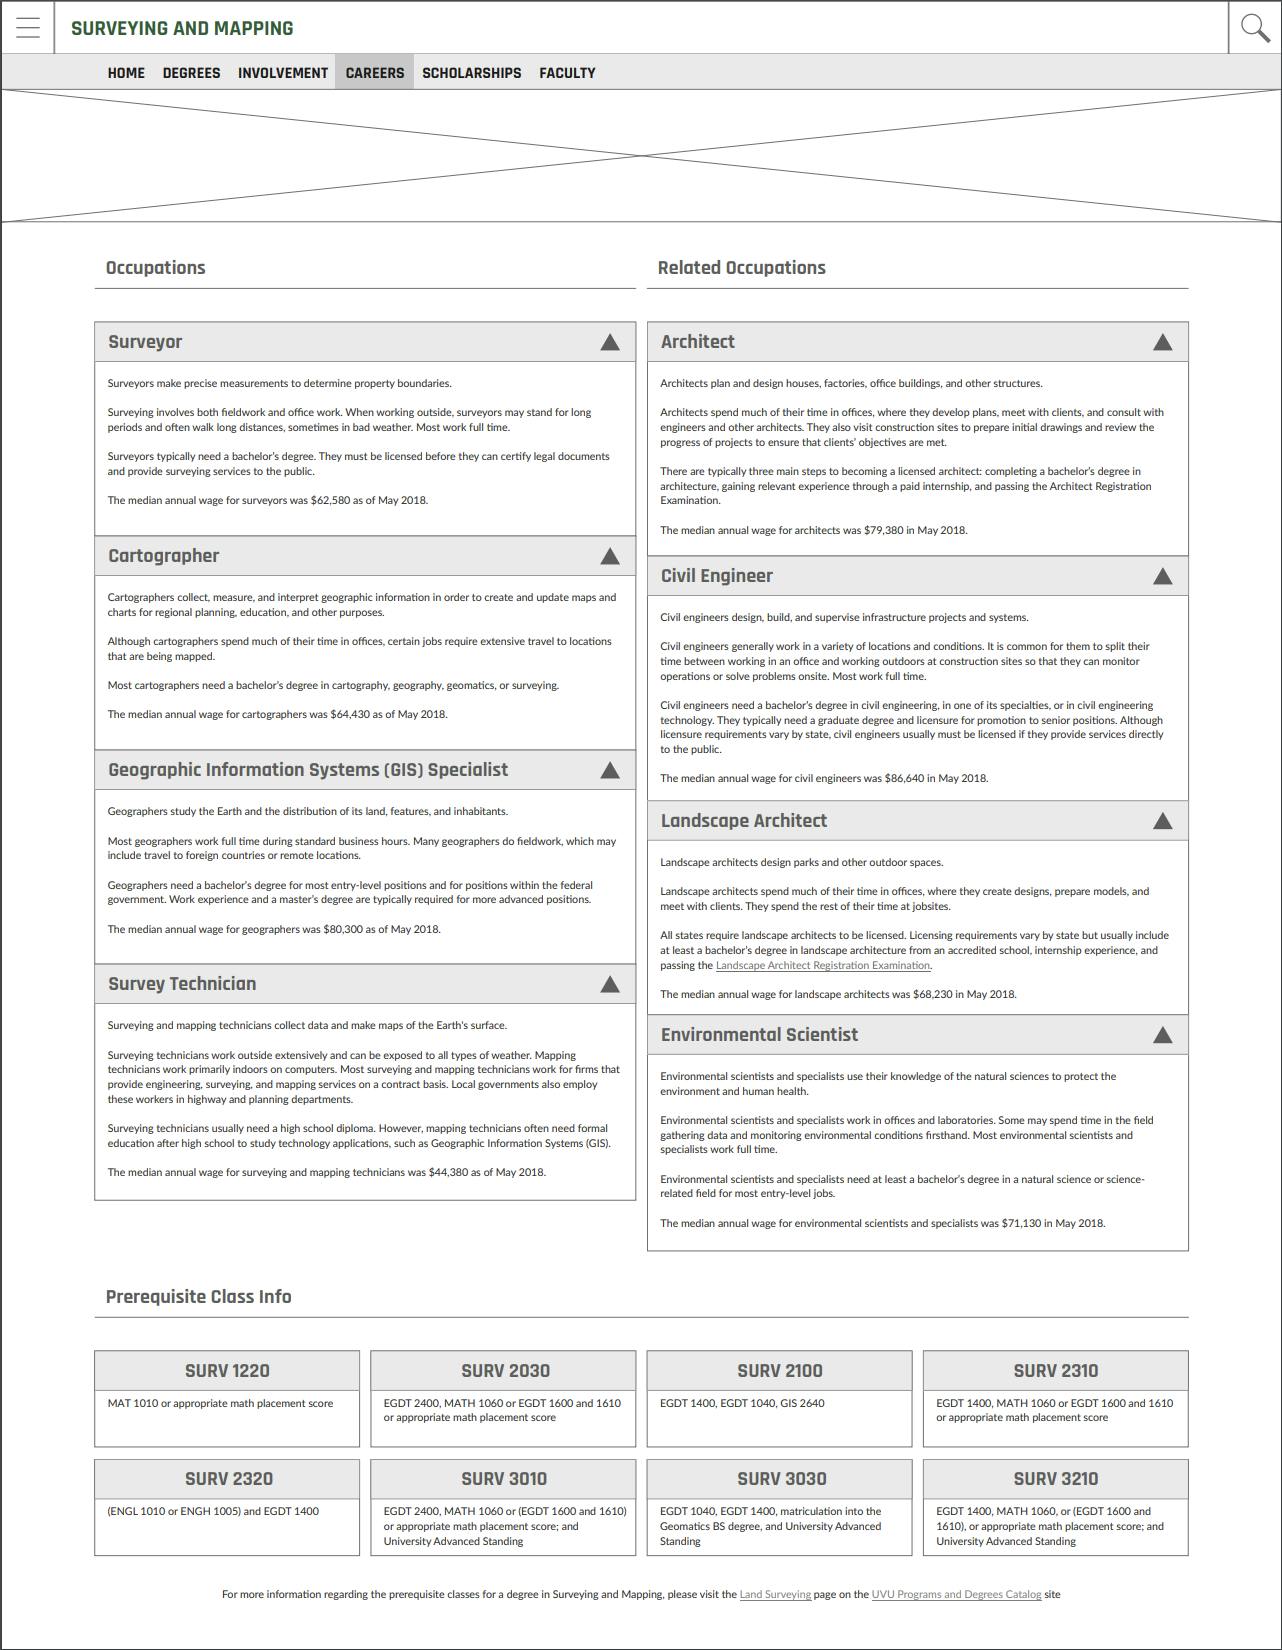 Careers Page
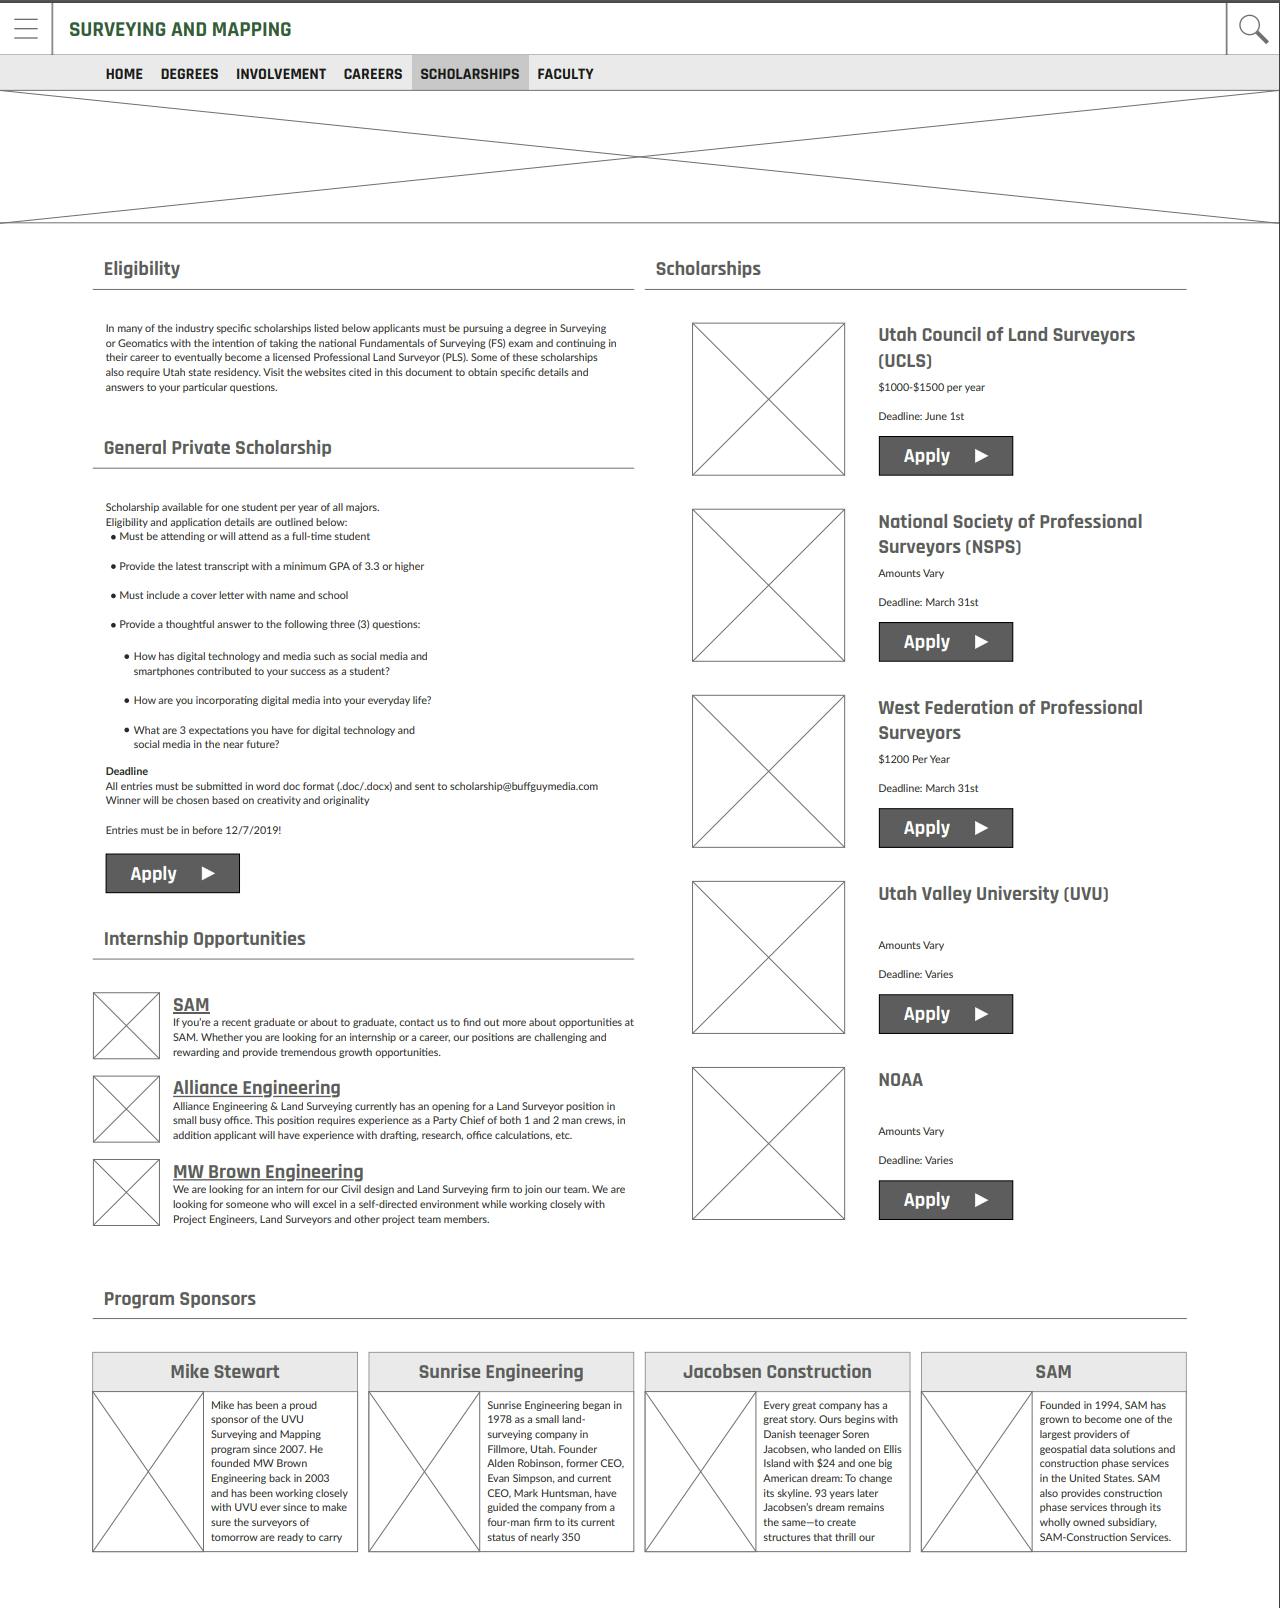 Scholarships Page
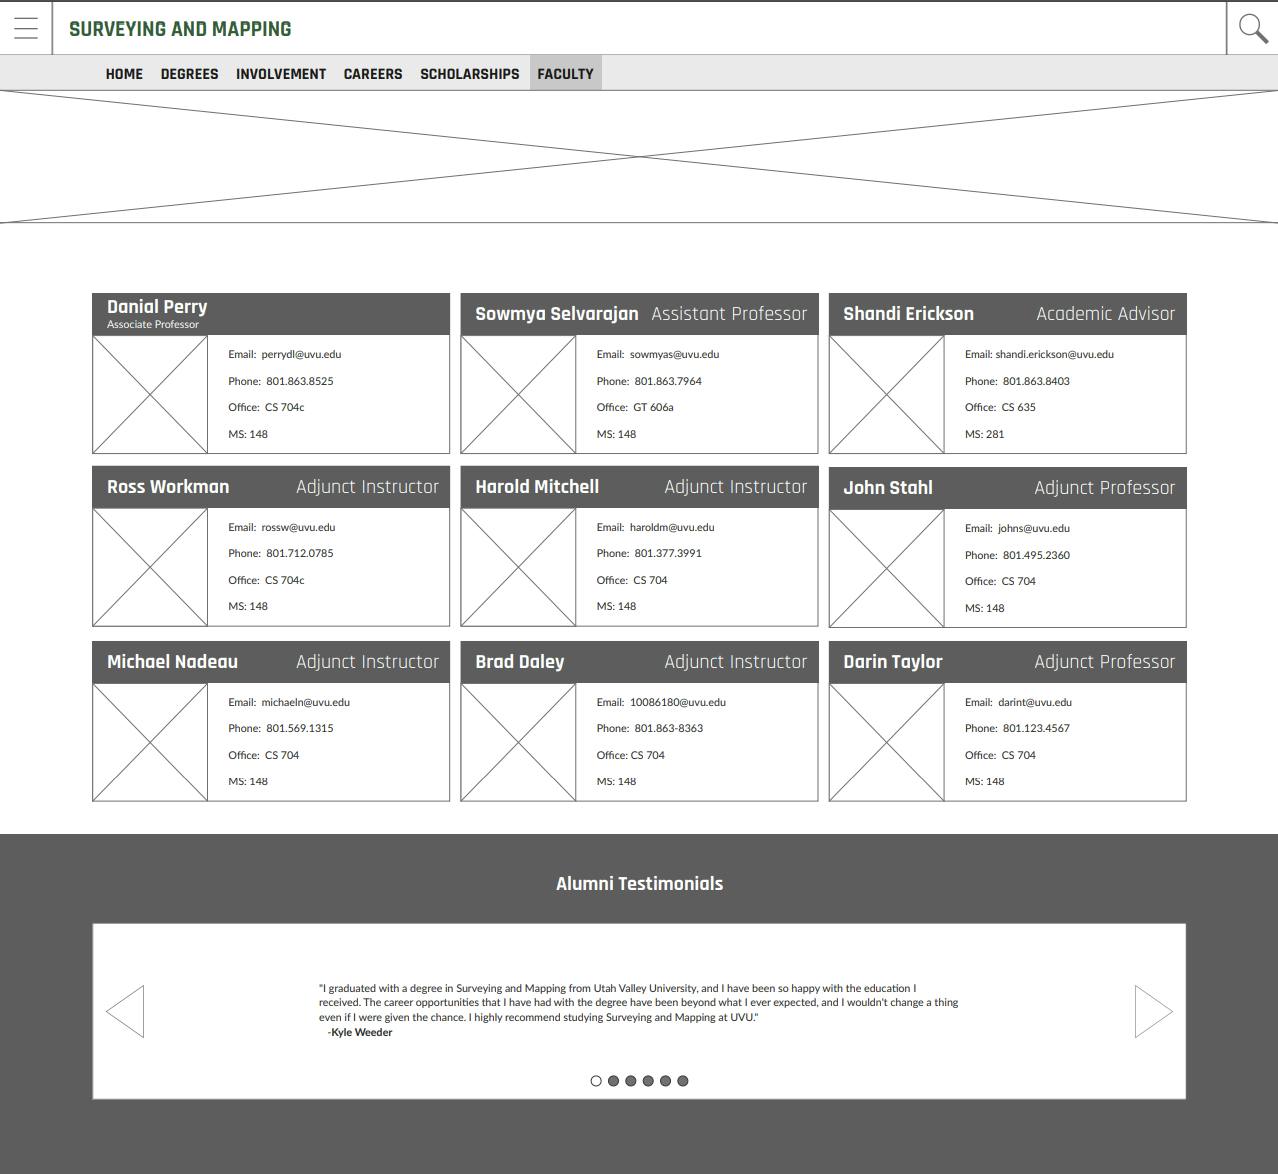 Faculty Page
Learning About Images, Audio & Video Formats
 on [Unsplash](https://unsplash.com?utm_source=medium&utm_medium=referral)](https://cdn-images-1.medium.com/max/11910/0*3IQGhrG8sI9sdO0o)
Since every website needs images, videos and sometimes audio, I decided to study a little bit more about this topic to make sure, I will know how to render these types of formats inside of my current project.
This is what I learned about Images:
Image Manipulation:
Pixelmator Inkscape Fireworks GIMP
Photoshop The more popular Image format in this industry:
JPG, TIF, PNG, GIF, RAW Images, GIF Standards from the abbreviation: Joint Photographic Experts Groups Tagged Image File Format Portable Network Graphics Graphic Interchange Format
Graphic Interchange Format History and other findings:
JPEG files are usually used for photographs on the web because they create a small file that is easily loaded on a web page and also looks good. GIF This format is never used for photography, because of the limited number of colors. GIFs can also be used for animations. PNG files are exclusively for web images, never for print images. For photographs, PNG is not as good as JPEG, because it creates a larger file. But for images with some text or line art, it’s better, because the images look less “bitmapped.” Raw files usually contain a vast amount of data that is uncompressed. Because of this, the size of a raw file is extremely large. Usually they are converted to TIFF before editing and color-correcting. TIFF is the most common file type used in photo software (such as Photoshop), as well as page layout software (such as Quark and InDesign), again because a TIFF contains a lot of image data.
This is what I learned about Video:
 on [Unsplash](https://unsplash.com?utm_source=medium&utm_medium=referral)](https://cdn-images-1.medium.com/max/12000/0*FrerKNL7JtN_8DGc)
Software to Editing Videos
Adobe Premiere Pro CC. Final Cut Pro X Adobe Premiere Elements 2019 KineMaster Corel VideoStudio Ultimate Filmora
Cyberlink PowerDirector Extensions
H.264 MPEG-4 DivX MPEG-2
HEVC (H2.65) H.264 Probably the most common, particularly for HD, is H.264. It’s one of the more efficient codecs, allowing smaller file sizes while retaining high quality as well as offering options for either lossless or lossy compression.
It’s compatible with the .MP4 container and can be played on many different players and streaming services.
MPEG-4 Another very common codec for online streaming is the MPEG-4 codec. Newer standards within MPEG-4 (specifically MPEG-4 Part 10) are identical to H.264, while the older MPEG-4 Part 2 is somewhat different. MPEG-4 has a very wide range of compatibility.
Video Formats DivX DivX, along with the open-source version XviD, is a somewhat older codec that is designed to maximize video quality at the expense of having significantly larger file sizes. It’s commonly used in a variety of commercial settings where there is less concern over file size. MPEG-2 A predecessor to MPEG-4, MPEG-2 was the standard codec for use on DVDs and early Blu-ray discs. It’s not commonly used for streaming video. Professional camera codecs which use MPEG-2 are HDV and XDCAM. HEVC (H.265) New video codecs are constantly evolving to keep up with modern technology.
HEVC, also called H.265, is one such codec designed to offer more efficient compression for 4K video and Blu-ray. It’s the video compression standard widely used by GoPro to capture their level of video content at half the size.
 on [Unsplash](https://unsplash.com?utm_source=medium&utm_medium=referral)](https://cdn-images-1.medium.com/max/10796/0*NmTiLUimX6pdLB1Y)
Common Video Containers Like video codecs, there are common video containers:
MP4 AVI MOV FLV WMV
Video Formats MP4 The .MP4 container is probably the closest thing to a universal standard that currently exists. It can use all versions of MPEG-4 and H.264 and is compatible with a huge range of players.
Videos using the.MP4 container can have relatively small file sizes while retaining high quality. Many of the largest streaming services, including YouTube and Vimeo, prefer.MP4.
AVI One of the oldest and most universally accepted video file formats is.AVI. It can use an enormous range of codecs, resulting in a large variety of different file settings. While.AVI videos can be played on a wide range of players, file sizes tend to be large making it less ideal for streaming or downloading. It’s a great option for videos you plan to store on a computer. MOV (Quicktime) Apple developed the.MOV container to use with its Quicktime player. Videos using.MOV generally has very high quality but also fairly large file sizes.
Quicktime videos don’t have as much compatibility with non-Quicktime players, though there are third party players that will read them.
FLV (Flash) Made for Adobe’s Flash Player, FLV videos were extremely common for a number of years thanks to their very small file size and a wide range of browser plugins and third-party Flash video players. There has been a significant decline in Flash videos recently.
Video Formats WMV (Windows Media) Windows Media videos tend to have the smallest file size, which makes them a good option if you need to send through email or other methods with file size limits. However, this comes with the tradeoff of having a significant drop in quality. A common usefor..WMV is emailing video previews to clients.
Screenshots:
https://screencast.com/t/dCPheevZOrw7 https://screencast.com/t/2JC17lia2PR
Things that I learned about Audio Formats
Audio Formats
 on [Unsplash](https://unsplash.com?utm_source=medium&utm_medium=referral)](https://cdn-images-1.medium.com/max/7644/0*2Sj4buSIUHnQUv2T)
PCM: Pulse-Code Modulation / This extension is used for CDs and DVDs. WAV: Waveform Audio File Format / This type of file contains uncompressed audio in PCM format. AIFF: Audio Interchange File Format / Files contain uncompressed in PCM format Audio Formats with Lossy Compression Lossy compression is when some data is lost during the compression process — and compression is important because uncompressed audio takes up lots of disk space. MP3: MPEG-1 Audio Layer 3 / released back in 1993.
AAC: AAC stands for Advanced Audio Coding. It was developed in 1997 as the successor to MP3, and while it did catch on as a popular format to use, it never really overtook MP3 as the most popular.
OGG: OGG doesn’t stand for anything. Actually, it’s not even a compression format. OGG is a multimedia container that can hold all kinds of compression formats but is most commonly used to hold Vorbis files — hence why these audio files are called Ogg Vorbis files.
Audio Formats with Lossless Compression
It is a method that reduces an audio file’s size without ANY loss of data between the source audio file and the compressed audio file. FLAC: Free Lossless Audio Codec / It was developed and launched in 2004 as a proprietary format but eventually became open-source and royalty-free in 2011. WMA (Lossless): Windows Media Audio / We covered this above in the lossy compression section, but we mention it here because there’s a lossless alternative called WMA Lossless that uses the same extension. RAW: a raw file can contain audio in any codec but is usually used with PCM audio data.
My Internal Rules To Keep Everything Organized
Assets Management Practices
Example of how I organized my files inside of my computer:
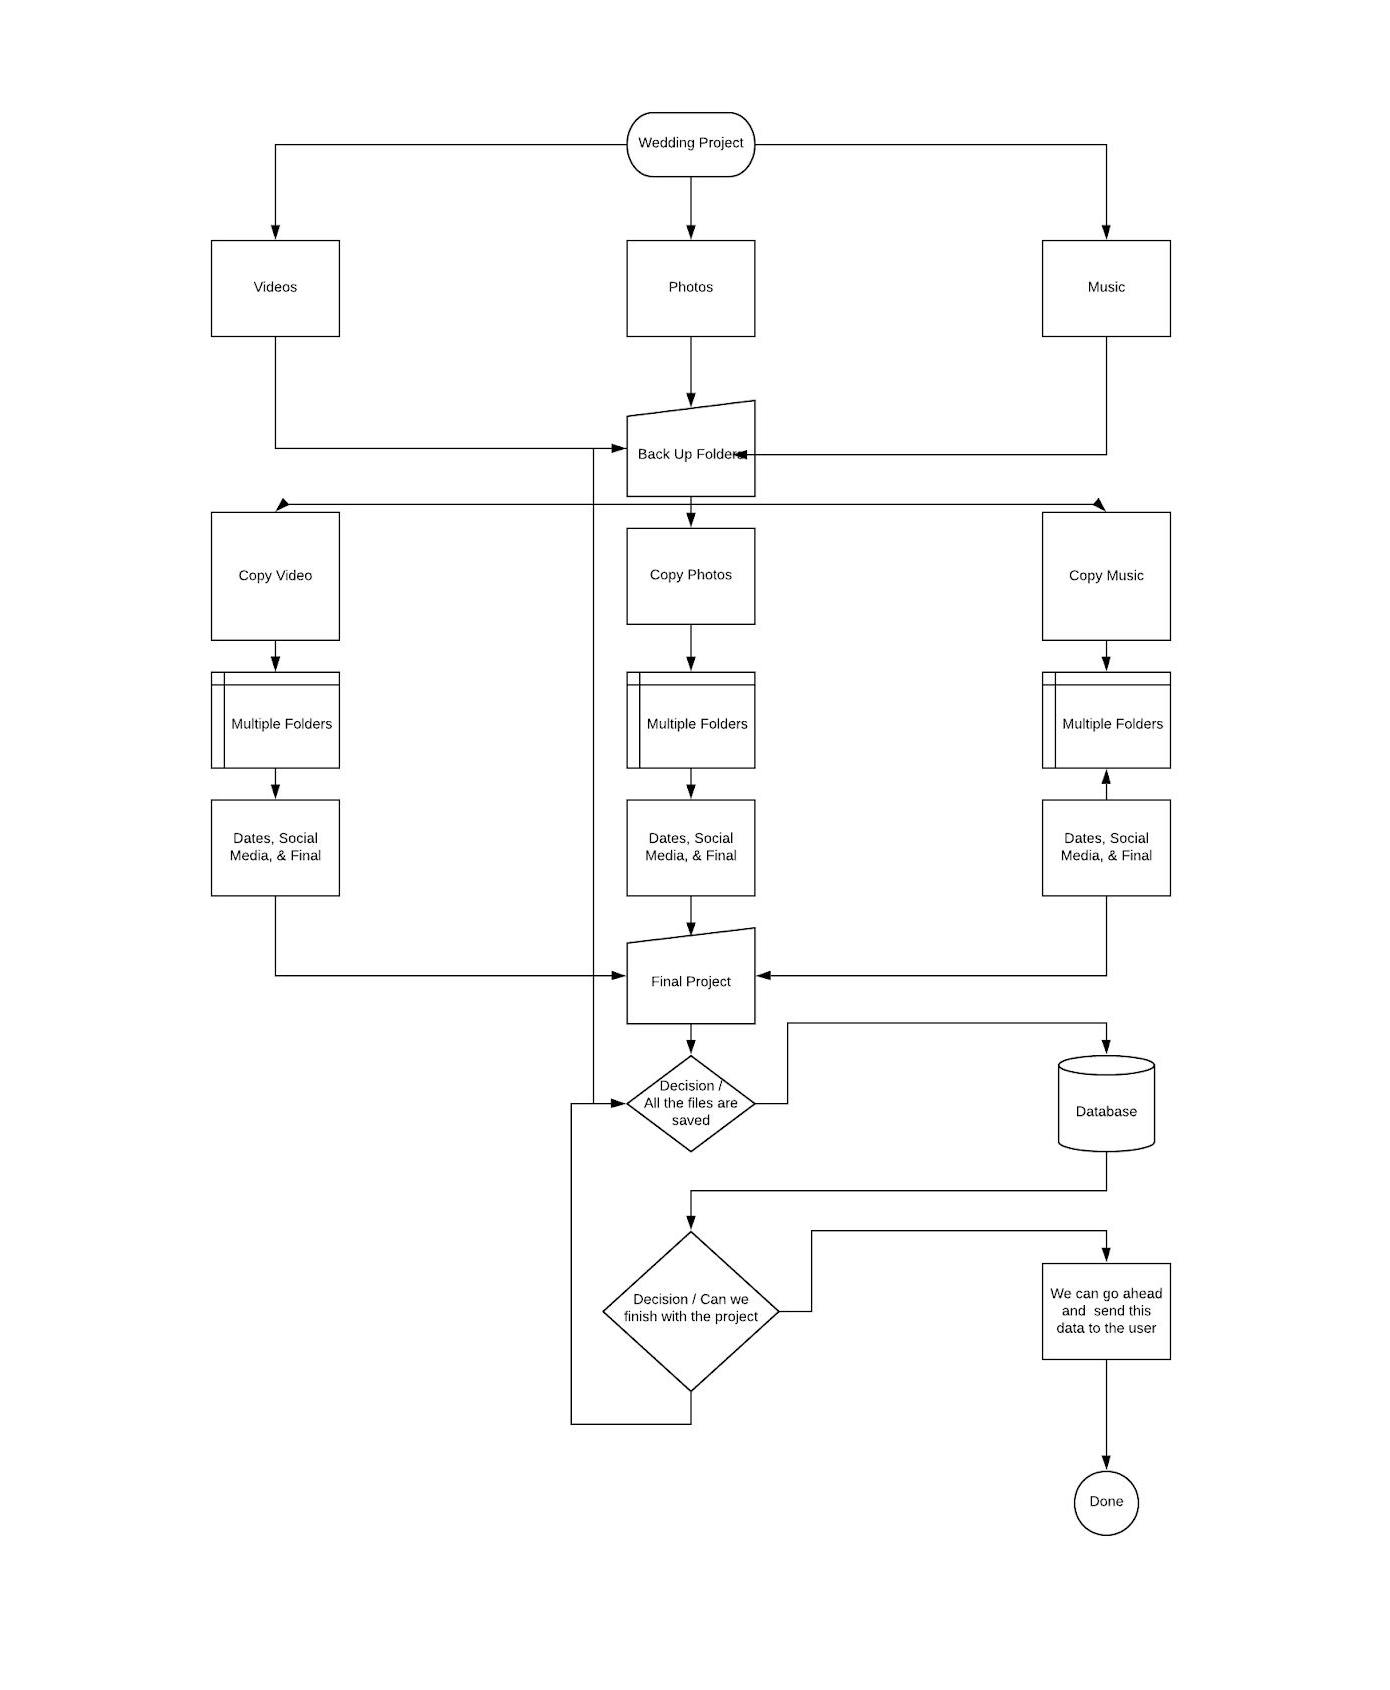
Image Integration
Image integration is one of the most important things to do inside of the projects since the quality of your images will create a good or bad impact on your audience. For this reason, I decided to start downloading big images from Unsplash.
Then, I choose photoshop to resize and compress the images that I have for this project:
Resize Image
Bring Photo Into Photoshop Select “Image”, then select “Image Size”
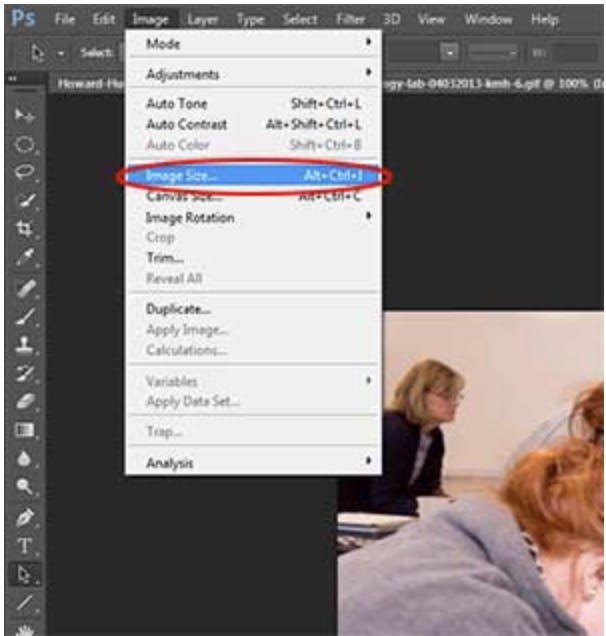
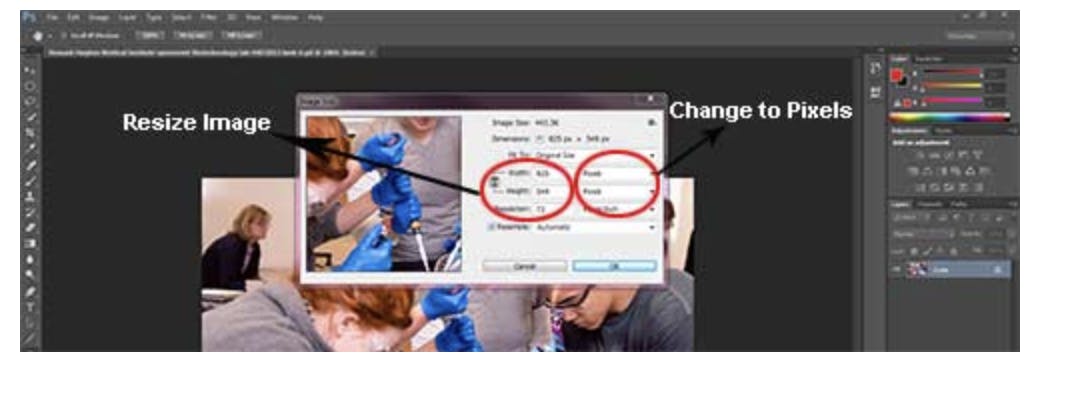
Measure your photo in Pixels. Resize to the correct dimensions and click OK.
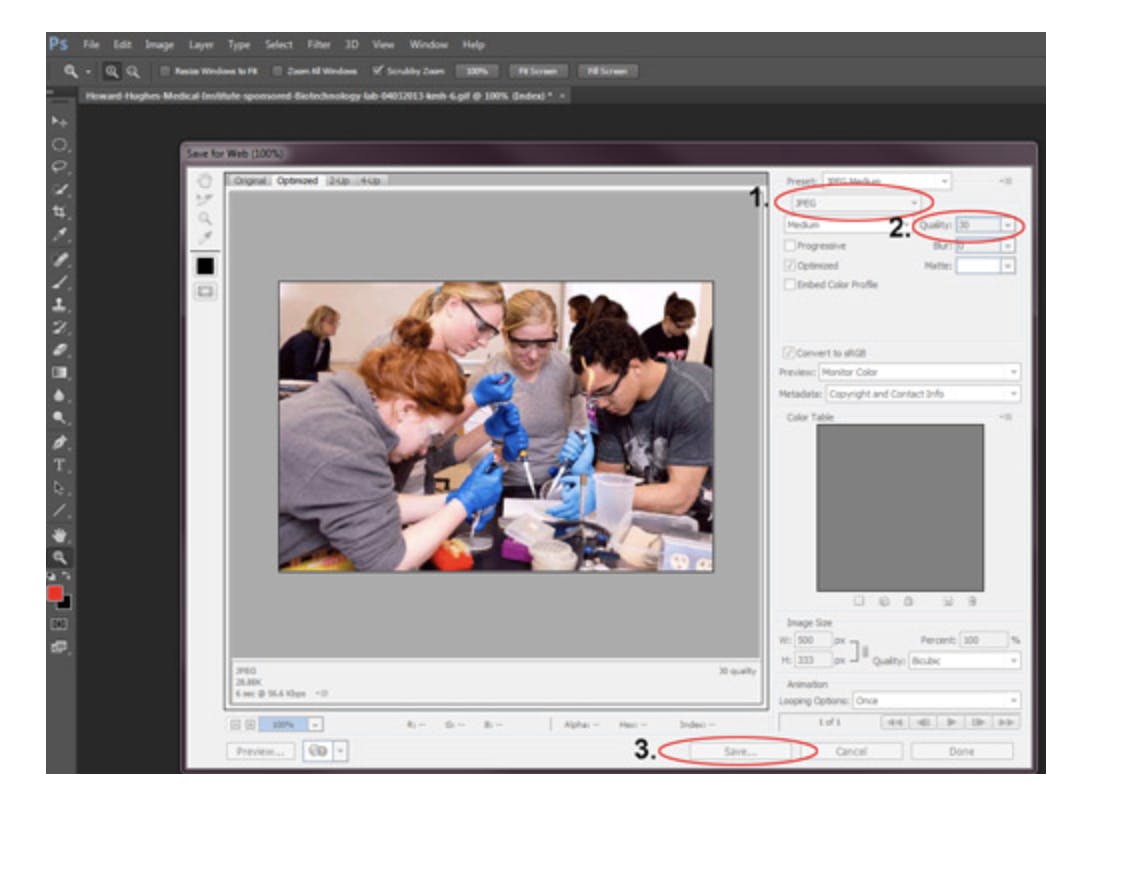
Save your file as a JPEG Compress the file between 60% and 80%. Use the photo view on the left do determine the percentage of compression. The higher the percentage the better the quality of the photo. Click Save.
Video Integration
Video integration is another one of the most important things to do inside of the projects since the quality of your videos will create a good or bad impact on your audience as well. For this reason, I decided to start downloading good quality videos through an extension called **Vimeo™ Video Downloader to have the ability to download videos from Vimeo.**
To compress a video I normally use VIP Video Converter. These are the steps:
Download and install VIP Video Converter.
Choose MP4 at the formats menu at the top, and choose the “MP4 Compressed” profile.
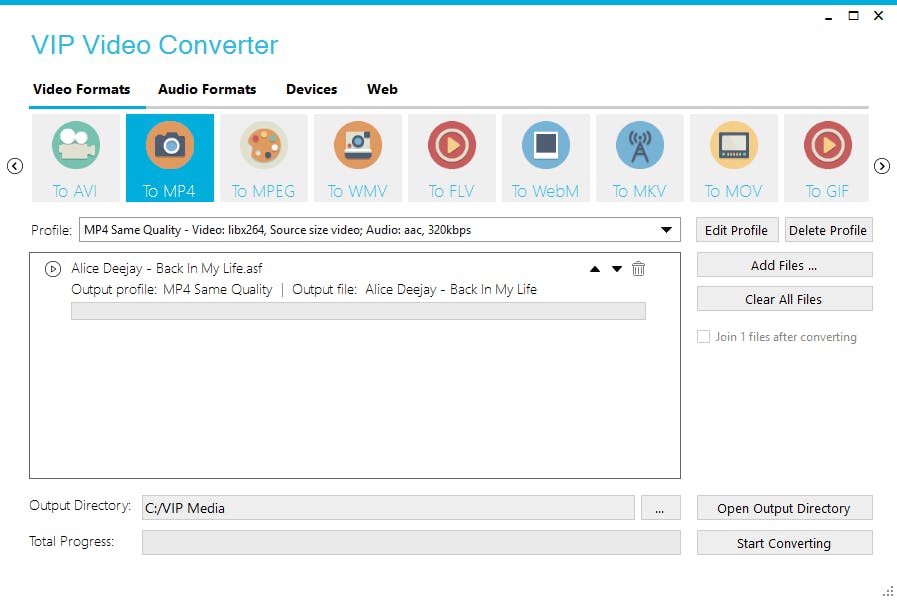
Click Add Files and choose the video file you would like to compress/reduce the size of.
Click Start Converting, and the compression will begin. The compression duration can vary depending on the video file size.

Once the conversion is done, the compressed video file will be available in the output directory.
You can now compare the video file sizes and see the compression ratio / how much space you saved. In our example, these were the results:

To explain this concept a little bit more, I will recommend you to take a look at the following links: Process - Final Project 6 Screens, Published on Dec 12, 2019 07:24 GMTxd.adobe.com Seriously 4 Screens, Published on Dec 13, 2019 05:56 GMTxd.adobe.com
Time to present you the High-Fidelity Prototype & Usability
In this process, I would like to explain a little bit of the concepts that applied to this design and the reason why I choose this style. A8 Structure - Wireframes - Group 3 30 Screens, Last modified on Dec 05, 2019 20:38 GMTxd.adobe.com
The design Concepts:
Prioritization: I wanted to provide students and parents with an effortless experience while looking for the information they’re wanting on the site. Making the site simple and very user-friendly. White Space: I designed with white space to make sure the end-user will not feel overwhelmed. Proportion: The rule “Yelling, Screaming & Talking” has been applied to my design. Design Pattern: I utilized the standards from Utah Valley University to make sure the end-users don’t get confused.
Conclusion
In my conclusion, I would like to say that being part of this project was fun and stressful since I like designing and I didn’t have a lot of knowledge of how to start collecting all the data that I needed to be able to start working on this project. However, I will say that I like to be a challenge all the time and that I like to learn new things every single day to make sure I will succeed in the future.
As you can see this is one idea that I came across this semester, and I know that I will start getting better ideas to start participating in more projects. You don’t need to have high expertise on how to do things, and you don’t need to have a college degree to start creating content and start building projects.
My recommendation here is to start looking into videos on Youtube, Tutorials on Udemy, LinkedIn Courses, Facebook Groups, & Meetups to start learning how to be a UX / UI Designer. Everything starts with a Google Search before to be an expert.
If you have questions, you will need to email me at hvaandres@icloud.com. Please take a look at my website, repl, twitter, Github, Spanish Medium Account, and LinkedIn.